Tutorial: How to Quickly Animate Text and Graphics with Red Giant Universe 2.0
Paul Schmutzler demonstrates key animation features in the new Red Giant Universe effects and transitions suite.
Recently, Red Giant released Universe 2.0, an updated suite of plugin filters and transitions available now for Adobe After Effects and Premiere Pro. I got my hands on them and started working with them just in time for a project that was very graphics-heavy, and some new features in Universe made my job a lot easier.
The suite saved me a ton of time, and it’s perfect for those who may not have the budget for a voiceover need to put all of their instructions on-screen with text that looks good. In my project, I used a little bit of graphic design expertise, combined it with Universe and came up with a really snappy-looking set of titles that don’t simply look like someone tried to make a video from PowerPoint.
Figure 1 (below) shows my Premiere Pro timeline for this project. As you can see, all of the magenta-colored bars here are all graphics, so have several layers, with the video in track V1.

Figure 1. My Premiere Pro timeline. Click the image to see it at full size.
The purpose of this video was to instruct people how to install this particular graphic on the glass in the right way. We demonstrated three ways: a bad way, with the message “Too little care will lead to product failure” in red; an OK but flawed way with a message in yellow for caution; and the preferred way, highlighted in green, as shown in Figure 2 (below).
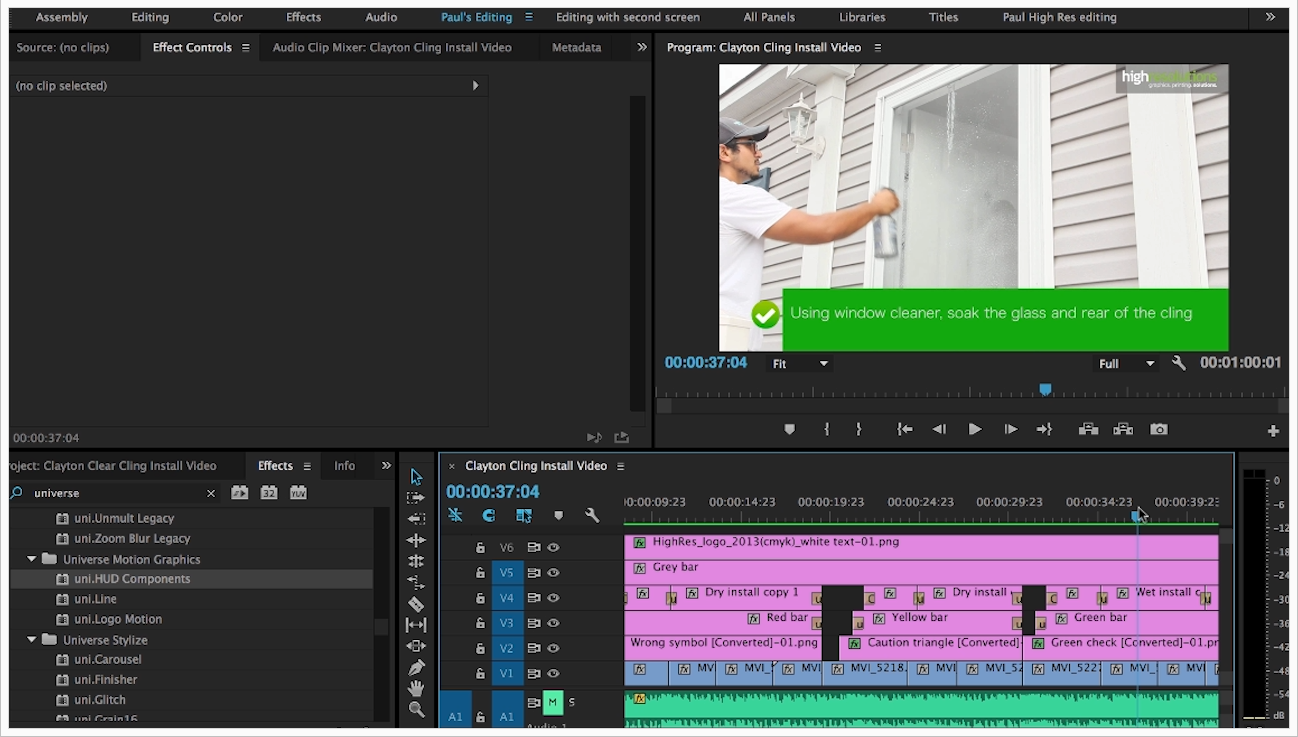
Figure 2. The green-highlighted instructional text. Click the image to see it at full size.
You can see the animation at the 1:40 mark of the accompanying tutorial video. Now we'll go backwards and I'll show you what I've done and how I've used Universe to make my job a lot easier.
Animating the Logo Bug
After watching this clip you’ve basically seen every effect that I used in this entire video. I reused the same ones to keep a consistent look throughout, changing a few of the parameters here and there. I changed the text size and the graphic size so that everything is uniform. Starting from the top, I have the logo bug up in the right-hand corner. It's got a solid gray bar behind it with some opacity, and that is going to persist throughout the entire track.
As you can see in the very beginning of the clip, the logo is not there, and then it flies in and appears up in the corner. That is based on one of Universe's newest features called Logo Motion. We have several options here. First, you choose the track that you want to control. My title, as you can see in Figure 1 is on track V6, so that's what I have to select, and then I can choose a preset. Universe 2.0 has a great preset browser that makes choosing the preset very quick (Figure 3, below). Once you choose a preset, you're not tied to it; you can easily modify in the settings after choosing and previewing the effect.

Figure 3. Choosing a preset
As you scroll over a preset, Universe shows you very fast what it will look like. There are always different options. Most of them are pretty basic, such as changing the direction, but the one I chose to use was the lower-left bug pivot. I changed it from the lower left to the upper right, but this doesn’t really change the main effect in this preset, which involves how it will come on screen and go off screen. I selected that by clicking on the preset and then clicking Select.
Up in the Effect Controls for this Universe effect (Figure 4, below), you can choose to use the clip length for the duration of the effect, which means as long as this clip is on the track, the graphic to which you’ve applied the effect will fly in at the beginning for the duration that you set, and then at the end, wherever you stop it. In between the Transition Duration for coming in and off screen, there's an Idle Duration. You can use this to cause an idle animation to happen while the graphic on screen.

Figure 4. Effect Controls for the applied effect
I chose None for the Idle Animation because I didn't want the logo moving around and distracting viewers from the text that users need to read at the bottom of the screen, or from the action happening on the video track in the background.
They need to read the instruction, see the instruction and nothing else. The logo is just for branding when the video plays on YouTube so people know where it came from. Among the available Idle Animation options (Figure 5, below), I like Hover a lot because it just makes the logo slowly bounce in place, up and down. You can control that motion (so that, say, it bounce off screen), by adjusting the Idle Animation Properties.

Figure 5. Choosing the Hover Idle Animation option
You can also adjust the scale, anchoring, and motion blur. If you want it to have some blur when the graphic comes on screen, it will ease onto the screen with a natural-looking blur effect.
Related Articles
This tutorial walks viewers through a number of cool new effects, transitions, and text animation tools in Red Giant's omnibus plugin package, and shows how to navigate and customize the preset options available with each effect.
Clear Online Video's Stjepan Alaupovic explains how to systemize your media wrangling and backup using Red Giant's Offload app.
This tutorial will demonstrate how to use the Red Giant Instant 4K plug-in for Adobe Premiere Pro or After Effects to upgrade your 1080p footage in 4K projects.